The thought of a cool and comfortable home becomes a top priority throughout the summer months. If you’ve decided to invest in an air conditioner, congratulations! Proper ac installation in Alexandria, VA, is key to making sure you get the optimal performance and longevity of your new cooling system. To make the process smooth and efficient there are a few steps you can take to prepare your home. Let’s take a look at what you can do to prepare.
If you are installing a window air conditioner, make sure your window space is suitable—especially for double hung windows. Ensure the window sash, side panels, mounting brackets, and window frame are properly secured for safety and stability. Selecting the right window ac unit also depends on your room size to ensure effective cooling. Always follow manufacturer instructions for window air installation, as proper support and sealing are essential to prevent air leaks and ensure safe, efficient operation.
What should you do before an air conditioner installation?
Before an air conditioner installation, homeowners should prepare the home and installation area to help technicians work efficiently and safely:
- Clear space around the indoor unit and outdoor condenser location
- Move furniture, décor, or valuables away from work areas
- Ensure easy access to electrical panels, attic spaces, or ductwork
- Secure pets and keep children away from the installation zone
- Discuss thermostat placement and system access with the installer
Introduction to Air Conditioning
Air conditioning has become an essential part of modern living, especially as summer temperatures continue to rise. Whether you’re looking to escape the heat or improve your home’s energy efficiency, understanding the basics of air conditioning can help you make informed decisions. There are several types of air conditioning systems to consider, including central air conditioning, window air conditioners, and window AC units. Each system is designed to deliver cool air efficiently, but the right choice depends on your home’s layout and your specific needs.
Proper air conditioning installation is crucial for ensuring your AC system operates at peak performance. A well-installed air conditioner not only keeps your home comfortable but also helps you save on energy costs. Regular maintenance and timely repairs are equally important to keep your air conditioning running smoothly and efficiently. By learning about the different options and the importance of professional installation, you can enjoy reliable cool air and a comfortable home environment all season long.
Choosing the Right Air Conditioner
Selecting the perfect air conditioner for your home involves more than just picking the first model you see. Start by considering the size of the room you want to cool, as this will determine whether a window air conditioner or a central air conditioning system is the best fit. For smaller rooms or apartments, a window air conditioner is often ideal, especially if you have a suitable window opening or double hung windows for easy installation. Larger homes may benefit from the consistent cooling power of central air conditioning, which can efficiently cool multiple rooms at once.
It’s also important to look at the energy efficiency of each air conditioning system. Models with high energy efficiency ratings, such as those with the ENERGY STAR label, can help you save on utility bills while reducing your environmental impact. Make sure to measure your window space carefully and check that the air conditioner you choose is compatible with your window type. By taking these factors into account, you’ll be able to select an air conditioner that delivers cool, comfortable air while maximizing energy efficiency and fitting seamlessly into your home.
Pre-Installation Checklist
Before your new air conditioner arrives, taking a few preparatory steps can make the installation process much smoother. Begin by measuring your window opening or designated installation area to ensure your new air conditioner will fit perfectly. Check your window space for any obstructions and confirm that the window frame is sturdy enough to support the unit. If you’re installing a central air conditioning system, inspect your existing sheet metal plenum and furnace heat exchanger to ensure they are compatible with the new air conditioner.
Next, review your home’s electrical wiring and circuit breaker to verify they can handle the power requirements of your new air conditioning system. If you’re unsure, consult a professional AC installer who can assess your setup and make any necessary upgrades. Preparing these elements in advance helps prevent delays and ensures a safe, efficient installation process. By following this pre-installation checklist, you’ll be ready for a hassle-free air conditioning installation and enjoy cool air in no time.
The Location
Selecting the right location for your air conditioner unit is an important first step. Consult with your HVAC technician to determine the best spot for installation. The location should have proper ventilation, clear space and easy access for maintenance. Avoid placing the unit near heat sources or direct sunlight as this can affect its efficiency.
Before the installation day make sure that the area around the chosen location is clear and clutter-free. Remove any obstacles, debris or objects that might hinder the installation process. A clear workspace will help the technicians to work efficiently and safely. The outdoor condenser should be placed on a composite pad to provide a stable, durable, and vibration-absorbing foundation.
Electrical and Ductwork Prep
Air conditioners need a dedicated electrical circuit to function well. Make sure that your home’s electrical system can accommodate the new unit’s power requirements. If needed consult an electrician to make any necessary upgrades to your electrical system prior to installation. Window air conditioners typically require a dedicated outlet due to the power they draw. A new service disconnect box may need to be installed outside the home to comply with the National Electrical Code, ensuring safe and accessible power shutoff for the air conditioning system. Proper low voltage wiring is also essential for connecting the thermostat and control systems, and should be installed according to code requirements.
The existing ductwork and ventilation system play an important role in distributing the cooled air throughout your home. Have a professional HVAC technician inspect the ducts for any leaks, blockages or damage. Properly sealed and functioning ductwork will help the efficiency of your new air conditioner, and may also be discussed in professional AC installation steps.
Removing the Old AC Unit
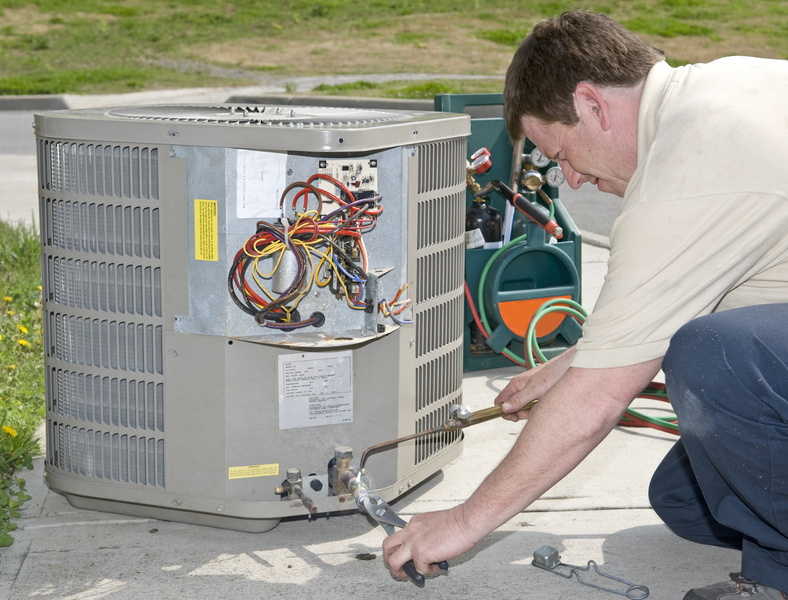
Before your new air conditioning installation can begin, it’s essential to safely remove the old ac unit. This process involves several complex tasks that are best handled by trained technicians using specialized equipment. First, the electrical wiring and refrigerant lines—typically two copper tubing lines used to connect the indoor and outdoor units—must be carefully disconnected from the existing unit. In some cases, refrigerant lines may be buried underground or concealed within walls, requiring special handling, rerouting, or replacement during removal to ensure system functionality and safety. Only EPA-certified personnel can handle and dispose of refrigerant due to its toxic nature, and a recovery tank is used to safely remove refrigerant from the old system. This step is crucial to prevent any accidental damage or safety hazards during the installation process. The technician will ensure that the refrigerant is properly contained and not released into the environment, following all safety guidelines and manufacturer’s instructions.
Once the electrical wiring and copper tubing lines are safely detached, the old ac unit is removed from its mounting bracket or window opening. The indoor evaporator coil must be disconnected before installing a new coil. If the existing refrigerant lines are damaged or inaccessible, a new line set may need to be installed for the new air conditioning system. The area is then thoroughly cleaned and prepared for the new air conditioning system. Taking these precautions helps ensure a smooth transition and sets the stage for a successful air conditioning installation. Trusting this part of the process to professionals guarantees that your new system will be installed safely and efficiently, without complications from leftover wiring or refrigerant lines.
Outdoor Unit Installation
The outdoor unit installation is a crucial phase in the air conditioning installation process, as it sets the foundation for your new air conditioning system’s performance and reliability. The process begins with placing the new air conditioner condenser on a leveled and sturdy pad, often made of composite material, to ensure stability and minimize vibration. This careful placement helps prevent movement that could lead to noise or damage over time.
Once the outdoor unit is securely positioned, the installation team connects the line set to the service valves on the new air conditioner condenser. These service valves are essential for isolating refrigerant within the unit, making future repairs or maintenance more straightforward without the need to replace refrigerant. The copper lines of the line set are then brazed to the service valves using oxygen and acetylene gases, along with a silver-alloy filler rod. This creates a strong, leak-free weld that is vital for the efficient operation of your air conditioning system.
To further protect your investment, a filter dryer is installed near the expansion valve within the condenser. This component absorbs moisture and filters out contaminants, safeguarding the air conditioning system from corrosion and acid formation. By ensuring each step of the outdoor unit installation is performed with precision, you set the stage for years of reliable, efficient cooling from your new air conditioner.
Indoor Evaporator Coil Installation
Installing the indoor evaporator coil is a key step in ensuring your air conditioning system delivers proper airflow and efficient cooling. The evaporator coil is typically located above or below your furnace, and its installation begins by disconnecting the existing sheet metal plenum. In some homes, access to this area can be challenging if rooms or walls have been built around the HVAC system, so some prep work may be required.
Modern indoor evaporator coils are often taller and more efficient than older models, which sometimes means adjustments to the supply plenum are necessary before installation. The new coil is carefully connected and sealed to the existing sheet metal plenum, ensuring there are no gaps that could disrupt airflow or cause leaks. A cased coil, which comes in an insulated cabinet with removable front panels, is preferred for its ease of access and superior insulation.
The coil is positioned on top of the furnace and sealed to the plenum, with custom rails fabricated to maintain the proper distance above the furnace heat exchanger. This precise placement is essential for optimal heat transfer and to ensure the system operates at peak efficiency. By focusing on a secure, well-sealed installation, you help your air conditioning system deliver consistent, comfortable cool air throughout your home.
Refrigerant Line Installation
The refrigerant line installation is a vital part of connecting your indoor evaporator coil to the outdoor unit, allowing the air conditioning system to transfer heat and provide cool air. This process involves installing a new line set, which consists of two copper lines: a larger insulated suction line and a smaller liquid line. These copper lines are routed close to beams and ductwork, and are securely fastened every 4-6 feet with plastic or copper strapping to prevent movement and minimize vibration.
To ensure efficient refrigerant flow, the installation team minimizes bends and turns in the line set, using hand tools or a tubing bender for precise shaping. The line set is then connected to the service valves on the outdoor unit and to the indoor evaporator coil, with all connections brazed using oxygen and acetylene gases and a silver-alloy filler rod for a durable, leak-free seal.
Before the system is charged with refrigerant, a preliminary leak test is performed using dry nitrogen at the manufacturer’s specified pressure. This step ensures the entire line set is free of leaks, protecting your air conditioning system from future issues. Once the test is complete, the line set undergoes a vacuum process to remove air, moisture, and non-condensable gases, ensuring optimal performance and longevity for your new air conditioner.
Condensate Drain Line Installation
Proper condensate drain line installation is essential for preventing water damage and maintaining the efficiency of your air conditioning system. The process starts by connecting a plastic PVC condensate drain line to the primary drain port of the indoor evaporator coil. This line is routed to a floor drain or, if necessary, to a condensate pump, which is especially useful when a floor drain isn’t available or when the installation layout requires it.
To prevent flooding, a trap and safety overflow switch are installed along the drain line. The safety overflow switch is wired into the furnace control, automatically shutting down the system if the drain line becomes clogged or overflows. This important safety feature helps protect your home from water damage and ensures the air conditioning system operates safely.
All condensate tubing and piping are securely fastened and glued with the appropriate cement to create a tight seal and prevent air leaks. If a condensate pump is used, it should be serviced at least twice a year to maintain optimal performance. By ensuring the condensate drain line is properly installed and maintained, you help your air conditioning system drain properly and avoid costly repairs down the road.
Prepare for Installation Day
On the day of installation it’s important to be prepared. Clear your schedule to ensure you’re available to greet the installation team and answer any questions they may have. To get a sense of air conditioning installation process, review the typical steps involved so you can feel confident and ready.
Working with an AC Installer
Partnering with a qualified AC installer is one of the best ways to guarantee your air conditioner is installed safely and operates at its best. When choosing an installer, look for professionals with a solid track record in air conditioning installation and positive reviews from local customers. Make sure they are licensed, insured, and certified to handle refrigerants, as required by law. A reputable AC installer will walk you through each step of the installation process, from removing your old system to setting up your new air conditioner.
Your installer should also ensure that your new system is properly sized for your home and that the installation meets all local building codes, including the National Electrical Code. This attention to detail helps prevent future issues and ensures your air conditioning system delivers reliable, efficient cooling. By working with an experienced AC installer, you can rest easy knowing your investment is protected and your home will stay comfortable all summer long.
Thermostats
If your new air conditioner comes with a thermostat or if you’re upgrading your existing one, think about its placement. The thermostat should be located away from direct sunlight, heat sources and drafts to correctly reflect the temperature in your home. You might also want to consider worthwhile HVAC system upgrades.
System Testing and Startup
Once your new air conditioning system is fully installed, thorough system testing and startup are essential to ensure everything is operating as it should. The installation process concludes with running the air conditioning system for 15-20 minutes, allowing refrigerant to circulate and the system to begin producing cool air. For accurate system charging, the indoor temperature should be above 75°F, providing the necessary load for precise adjustments.
During this phase, the installer checks the thermostat operation, verifies the system sequence, and collects operational data to confirm that all components meet manufacturer specifications. The system is also tested for leaks, and refrigerant is introduced only after a successful vacuum process has removed air and moisture from the lines. This careful commissioning ensures your air conditioning system delivers maximum comfort, efficiency, and dependability, while also preserving your manufacturer warranty.
Finally, the installer will demonstrate how to operate your new thermostat and answer any questions you may have about the system’s proper operation. With the installation process complete and your air conditioning system thoroughly tested, you can enjoy reliable, efficient cool air throughout your home.
Protect Valuables
The process involves some amount of drilling and maneuvering. Take precautions to protect valuable items, such as artwork, electronics and furniture from possible damage. Covering these items with drop cloths or moving them to a safer area can prevent accidental mishaps.
Ask Questions
Don’t hesitate to ask questions during the installation process. Your HVAC technicians are there to help and provide you with information about your new air conditioner. Your AC installer can provide guidance on system setup, thermostat programming, and answer any technical questions you may have about your new air conditioning system. Ask about maintenance, usage tips and any concerns you might have.
Preparing your home for air conditioner installation can greatly influence the success and efficiency of the process. Remember that a well-installed air conditioner not only keeps your home comfortable but also contributes to energy savings and prolonged system life. Enjoy the upcoming summer months in the cool comfort of your newly installed air conditioner.
Maintenance and Energy Efficiency
After your new air conditioning system is installed, ongoing maintenance is key to keeping your home cool and your energy bills low. New air conditioners are often larger than older models, which may require relocating the existing unit or modifying ductwork. Modern air conditioners tend to be larger to accommodate larger, more efficient coils. Regularly cleaning or replacing the air filter, checking refrigerant levels, and inspecting the electrical wiring and connections are all essential tasks to ensure your air conditioner runs smoothly. It’s also important to look for air leaks around your window unit or outdoor unit, as even small gaps can let cool air escape and reduce your system’s efficiency.
During maintenance, the drain pan should be checked regularly to ensure it is properly positioned and free of debris to prevent water damage. Filter driers are used in the system to absorb moisture and protect components from corrosion and contamination. Refrigerant lines should be pressure tested during maintenance to ensure there are no leaks.
Choosing a new air conditioner with a high energy efficiency rating, such as a high SEER (Seasonal Energy Efficiency Ratio), can make a significant difference in your home’s comfort and your utility costs. Energy-efficient air conditioning systems are designed to deliver optimal cooling while using less electricity, helping you maintain your desired temperature without wasting energy. Many HVAC companies offer maintenance plans and warranties with air conditioning installation, giving you peace of mind and protecting your investment for years to come. A too large air conditioning unit won’t eliminate enough humidity from the room, leaving it with damp feeling air. An undersized air conditioning unit will not be able to adequately cool the room, forcing it to work harder than it should. By staying on top of maintenance and selecting an energy-efficient model, you’ll enjoy reliable cool air and lower energy bills all season long.
After installation, system testing should be performed to ensure all components are operating correctly and efficiently.
Final Inspection and Approval
Once your air conditioning installation is complete, a thorough final inspection is essential to confirm everything is working as it should. During initial startup, the system should be run for a specified period to ensure proper refrigerant flow and system operation. Start by testing the air conditioner’s ability to cool the air and checking that it drains properly to prevent water damage. Inspect all electrical wiring, including the service disconnect box and low voltage wiring, to ensure they are securely connected and meet safety standards.
Examine the refrigerant lines, copper line set, and expansion valve for proper installation and operation. For lines routed along or beneath floor joists, ensure they are securely fastened to prevent movement and vibration. Make sure the line set is correctly routed and insulated to maintain energy efficiency. When inspecting the indoor components, check that the indoor coil is properly connected and sealed. When reviewing brazed joints, confirm that heat protection was used during installation to prevent damage to sensitive components.
Finally, test the thermostat and controls to verify they are accurately maintaining your desired temperature. By conducting a comprehensive final inspection and approval, you can be confident that your air conditioner is installed correctly, operates efficiently, and will provide dependable comfort for years to come.
Contact McDaniel Service, Inc today to schedule your appointment. Service is our middle name!